

R and RStudio basics
learning-objectives
- “Create an RStudio project, and know the benefits of working within a project”
- “Be able to customize the RStudio layout”
- “Be able to locate and change the current working directory with getwd() and setwd()
- “Compose an R script file containing comments and commands”
Create an RStudio project
One of the first benefits we will take advantage of in RStudio is something called an RStudio Project. An RStudio project allows you to more easily:
- Save data, files, variables, packages, etc. related to a specific analysis project
- Restart work where you left off
- Collaborate, especially if you are using version control such as git
To create a project, go to the File menu, and click New Project….
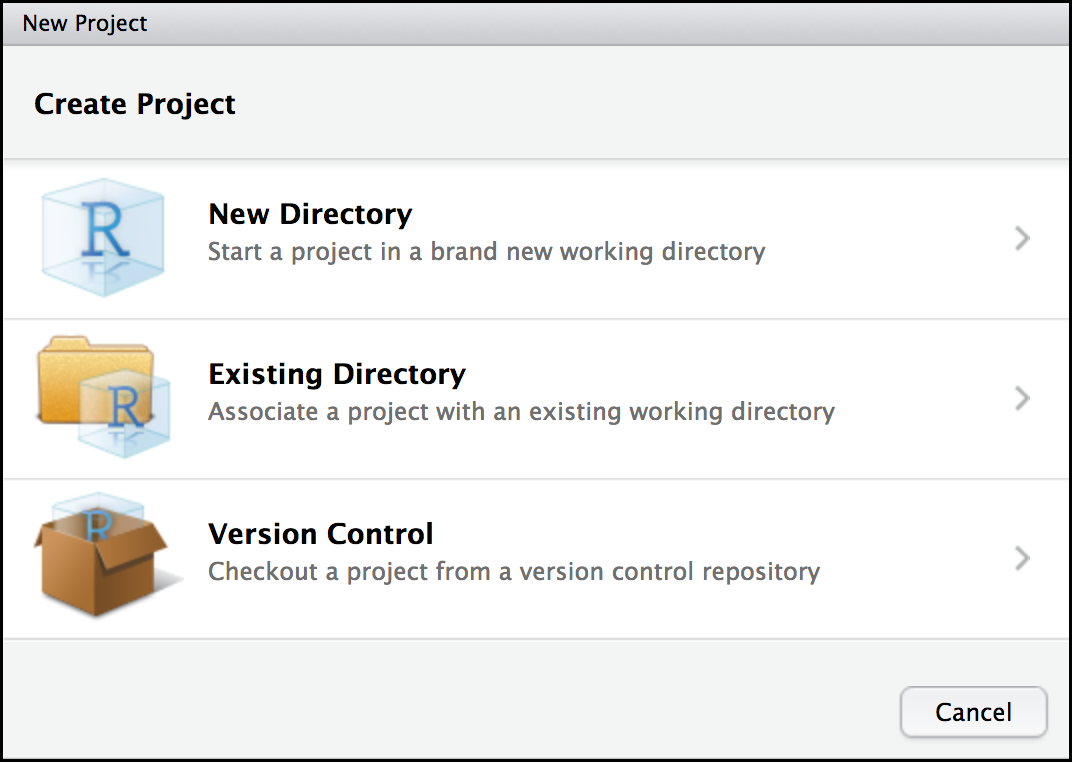
In the window that opens select New Directory, then New Project. For “Directory name:” enter r_learning. For “Create project as subdirectory of”, you may leave the default, which is your home directory “~”.
Finally click Create Project. In the “Files” tab of your output pane (more about the RStudio layout in a moment), you should see an RStudio project file, r_tutorial.Rroj. All RStudio projects end with the “.Rproj” file extension.
Creating your first R script
Now that we are ready to start exploring R, we will want to keep a record of the commands we are using. To do this we can create an R script:
Click the File menu and select New File and then R Script. Before we go any further, save your script by clicking the save/disk icon that is in the bar above the first line in the script editor, or click the File menu and select save. In the “Save File” window that opens, name your file “r_basics”. The new script r_basics.R should appear under “files” in the output pane. By convention, R scripts end with the file extension .R.
Tip
A script is simply a file (usually a text file) that contains a set of instructions (code) to be run by the computer. We will be writing several lines of code and running these lines of code line-by-line as we learn. Once you have finished with a script, all the lines of code can be run (from top to bottom) automatically.
Overview and customization of the RStudio layout
Here are the major windows (or panes) of the RStudio environment:

- Source: This pane is where you will write/view R scripts. Some outputs (such as if you view a dataset using View()) will appear as a tab here.
- Console/Terminal: This is actually where you see the execution of commands. This is the same display you would see if you were using R at the command line without RStudio. You can work interactively (i.e. enter R commands here), but for the most part we will run a script (or lines in a script) in the source pane and watch their execution and output here. The “Terminal” tab give you access to the BASH terminal (the Linux operating system, unrelated to R).
- Environment/History: Here, RStudio will show you what datasets and objects (variables) you have created and which are defined in memory. You can also see some properties of objects/datasets such as their type and dimensions. The “History” tab contains a history of the R commands you’ve executed R.
- Files/Plots/Packages/Help: This multipurpose pane will show you the contents of directories on your computer. You can also use the “Files” tab to navigate and set the working directory. The “Plots” tab will show the output of any plots generated. In “Packages” you will see what packages are actively loaded, or you can attach installed packages. “Help” will display help files for R functions and packages.
Tip
Uploads and downloads in the cloud
In the “Files” tab you can select a file and download it from your cloud instance (click the “more” button) to your local computer. Uploads are also possible.
All of the panes in RStudio have configuration options. For example, you can minimize/maximize a pane, or by moving your mouse in the space between panes you can resize as needed. The most important customization options for pane layout are in the View menu. Other options such as font sizes, colors/themes, and more are in the Tools menu under Global Options.
Note
You are working with R
Although we won’t be working with R at the terminal, there are lots of reasons to. For example, once you have written an RScript, you can run it at any Linux, Mac, or Windows terminal without the need to start up RStudio. We don’t want you to get confused - RStudio runs R, but R is not RStudio.
Getting to work with R: navigating directories
Now that we have covered the more aesthetic aspects of RStudio, we can get to work using some commands. We will write, execute, and save the commands we learn in our r_basics.R script that is loaded in the Source pane. First, let’s see what directory we are in. To do so, type the following command into the script:
getwd()
To execute this command, make sure your cursor is on the same line the command is written. Then click the Run button that is just above the first line of your script in the header of the Source pane.
In the console, we expect to see the following output:
[1] "/home/rstudio/r_learning"
Notice, at the Console, you will also see the instruction you executed above the output in blue.
Since we will be learning several commands, we may already want to keep some short notes in our script to explain the purpose of the command. Entering a # before any line in an R script turns that line into a comment, which R will not try to interpret as code. Edit your script to include a comment on the purpose of commands you are learning, e.g.:
# this command shows the current working directory
getwd()
Question
What happens when you try to enter the getwd() command in the Console pane?
Answer
You will get the same output you did as when you ran getwd() from the source. You can run any command in the Console, however, executing it from the source script will make it easier for us to record what we have done, and ultimately run an entire script, instead of entering commands one-by-one.
For the purposes of this exercise we want you to be in the directory “/home/rstudio/r_learning”.
What if you weren’t? You can set your home directory using the setwd() command. Enter this command in your script, but don’t run this yet.
# This sets the working directory
setwd()
You may have guessed, you need to tell the setwd() command what directory you want to set as your working directory. To do so, inside of the parentheses, open a set of quotes. Inside the quotes enter a / which is the root directory for Linux. Next, use the Tab key, to take advantage of RStudio’s Tab-autocompletion method, to select home, rstudio, and r-learning directory. The path in your script should look like this:
# This sets the working directory
setwd("/home/rstudio/r_learning")
When you run this command, the console repeats the command, but gives you no output. Instead, you see the blank R prompt: >. Congratulations! Although it seems small, knowing what your working directory is and being able to set your working directory is the first step to analyzing your data.
Tip
Never use `setwd()`
Wait, what was the last 2 minutes about? Well, setting your working directory is something you need to do, you need to be very careful about using this as a step in your script. For example, what if your script is being on a computer that has a different directory structure? The top-level path in a Unix file system is root /, but on Windows it is likely `C:`. This is one of several ways you might cause a script to break because a file path is configured differently than your script anticipates. R packages like here and file.path allow you to specify file paths is a way that is more operating system independent. See Jenny Bryan’s blog post for this and other R tips.
Fix or improve this documentation
- Search for an answer: CyVerse Learning Center
- Ask us for help:
click
 on the lower right-hand side of the page
 - Report an issue or submit a change: Github Repo Link
- Send feedback: Tutorials@CyVerse.org